10 Exterior Window Trim Tips for Buyers

10 Exterior Window Trim Tips for Buyers

Exterior window trim can make a house look cared for, but buyers should look beyond fresh paint. Check how the trim meets the siding, sill, and window frame. Soft wood, open joints, peeling paint, and dark staining may point to moisture exposure. Not every stain means a serious defect. Still, it deserves a closer look.

The 2024 Cost vs. Value Report, published by Remodeling and Zonda, estimates a national average cost of $21,264 for vinyl window replacement, with $14,823 recouped at resale. That figure covers window replacement, not trim alone, and local costs vary. It does show why condition matters. The U.S. Department of Energy and ENERGY STAR report that replacing single-pane windows with certified models can reduce household energy bills by about 7–15%, depending on the home and climate. Trim itself does not deliver those savings. Proper installation and water management matter more.

Look closely.

A narrow gap at a corner can be easy to miss during a quick viewing. Ask when the trim was last repaired, and whether flashing or caulking work is documented. Photos of concealed areas can help, though they are not proof of sound installation. A qualified inspector can assess visible concerns and recommend further evaluation when needed. Paint can hide defects. It can also simply be paint. The tips below help buyers distinguish routine upkeep from warning signs, compare materials, and ask more useful questions before making an offer.
10 Exterior Window Trim Tips for Buyers

Understanding the Purpose and Types of Exterior Window Trim

Exterior Window Trim: Purpose and Types

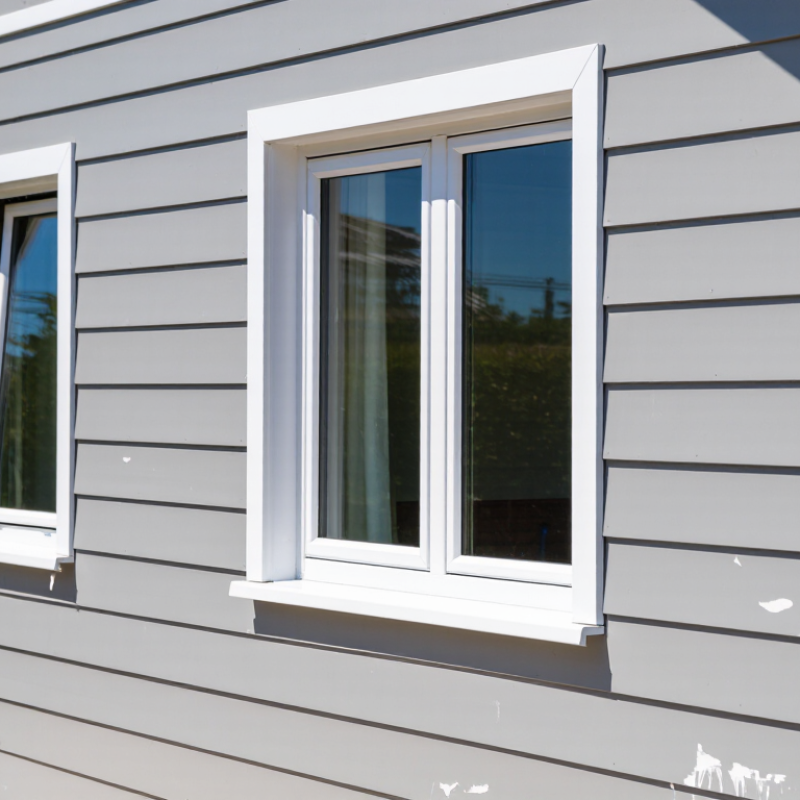
Exterior window trim is the finished border around a window. It hides the gap between the frame and siding, gives the opening visual definition, and helps shed rain when correctly detailed. Common parts include side casings, a head casing, a sill, and a projecting drip cap. The trim is not a substitute for flashing or a sound weather barrier. Water can still enter behind attractive boards.

Materials suit different conditions. Wood is easy to shape, but exposed edges need regular paint or stain. Cellular PVC resists rot, though it can expand in heat and needs suitable fastening. Fiber-cement trim is stable but heavier to cut and install. Aluminum cladding protects wood underneath, yet dents may be difficult to repair. Small details matter: a sloped sill and outward-projecting cap help move water away from the wall.

The U.S. Department of Energy’s Energy Saver guidance estimates that heat gain and loss through windows account for 25–30% of residential heating and cooling energy use. That figure concerns the window, not trim alone. ENERGY STAR estimates that replacing single-pane windows with certified models can save an average of 12% on energy bills; trim cannot deliver those savings by itself. Still, sound joints around the opening help support a well-sealed installation. Choose profiles and materials for local exposure, upkeep, and the home’s scale. A trim board that looks right in a sample may feel too bulky beside a narrow window.

Exterior Window Trim: A Buyer’s Material Comparison

Trim frames the window, helps cover the joint between the window and siding, and contributes to the home’s exterior style. These illustrative ratings summarize common material trade-offs on a 1–5 scale, where 5 indicates a stronger fit for that consideration. Actual performance depends on the product, installation, exposure, and upkeep.

Assessing Trim Materials, Styles, and Compatibility

Before choosing exterior window trim, compare material performance with your climate and maintenance habits. Wood is easy to shape and repaint, but exposed end grain can absorb water. PVC resists rot, though heat can cause expansion; installation gaps matter. Fiber cement is stable and paintable, but cut edges need proper sealing. Aluminum is low-maintenance, yet a ladder or hail can leave dents. Look closely.

Style should suit both the house and the window opening. Wide, layered trim can give a plain façade more definition, while narrow profiles may sit better on a simple contemporary home. Hold a sample beside the siding in morning and afternoon light. A bright white edge can look stark against warm brick. I once underestimated that contrast; small samples can mislead.

Check how the trim meets siding, head flashing, and the sill before settling on a profile. These junctions help direct water away from the wall, so appearance should not hide drainage details. Confirm that the chosen material works with the window frame and follows its installation guidance. Existing homes can be uneven, too. A perfectly symmetrical trim plan may need adjustment around an older opening.

Inspecting Condition, Installation, and Weather Protection

Inspect exterior window trim from the ground and up close. Look for peeling paint, soft wood, cracked caulk, and dark staining beneath the sill. Press gently near lower corners with a fingertip; softness can signal trapped moisture. Check whether trim joints have opened, and whether water can drain away instead of collecting on a flat ledge. A fresh-looking paint coat is not proof of sound wood. The U.S. Department of Energy’s Energy Saver guidance says air leaks can account for 25%–40% of heating and cooling energy use in a typical home, making gaps around windows worth investigating.

Tips: Bring a flashlight and inspect after rain. Look for damp interior casing, fogging between panes, and loose exterior caulk. Note exact locations with photos. A small gap matters.

Check how the trim meets the siding and window frame. Head flashing should direct water outward, while sealant should not block intended drainage paths. Ask for installation details or repair records when available; hidden flashing cannot be verified by appearance alone. Industry guidance from the American Architectural Manufacturers Association emphasizes proper integration of window flashing with the wall’s water-control layers. If you see swollen wood, recurring stains, or a gap that disappears behind siding, consider a qualified inspection before purchase. One imperfect clue is rarely decisive, but several together deserve attention.

10 Exterior Window Trim Tips for Buyers - Inspecting Condition, Installation, and Weather Protection

# Inspection Tip What to Check Why It Matters Buyer Follow-Up
1 Look for Rot and Soft Spots Examine wood trim at lower corners, joints, and areas near the sill for crumbling, softness, or swelling. A gentle probe can help identify deteriorated wood. Moisture-damaged trim may indicate prolonged water exposure and can allow damage to spread to nearby materials. Ask an inspector to assess the extent of deterioration and whether repair or replacement is needed.
2 Check Paint and Coatings Note peeling, blistering, cracking, or bare wood. Look especially at exposed edges and joints. Failed coatings leave wood more vulnerable to moisture and weathering; peeling paint can also hide underlying deterioration. Find out when the trim was last prepared and painted, and whether damaged areas need repair before repainting.
3 Inspect Caulked Joints Look for gaps, cracked or detached sealant, and open joints where trim meets siding or the window frame. Failed sealant can provide a path for wind-driven rain, though caulk alone is not a substitute for proper flashing. Check whether the joint needs compatible exterior sealant and confirm that drainage openings remain unobstructed.
4 Look for Staining and Water Tracks Check below corners, along the sill, and on nearby siding for dark stains, streaks, or persistent discoloration. Water marks can point to recurring leaks or poor water shedding, even when the trim appears intact. Ask about any past leaks and have the source investigated rather than covering the stain alone.
5 Check Trim Alignment and Gaps Look for loose, bowed, separated, or uneven trim and visible gaps at corners and joints. Movement or separation can expose edges to water and may indicate loose fasteners or installation issues. Have loose sections secured and determine whether the underlying framing or fastening needs attention.
6 Review Sill Slope and Drip Edges Where visible, check that the sill sheds water outward and that projecting edges or drip details direct water away from the wall. Water that sits on a horizontal surface or runs back toward the wall can increase the chance of moisture damage. Ask a qualified inspector or contractor to evaluate water-shedding details if the sill appears flat, damaged, or poorly fitted.
7 Look for Flashing Details Check for visible head flashing above the window where appropriate, and note signs of missing, bent, or poorly integrated flashing. Flashing helps direct water away from vulnerable joints; it should work with the surrounding wall’s drainage layers. Because some flashing is concealed, ask an inspector to assess visible evidence and recommend further evaluation if needed.
8 Identify the Trim Material Determine whether the trim is wood, a wood-based product, cellular PVC, metal, or another material, and look for material-specific damage. Different materials have different maintenance needs; for example, wood can decay, while other materials may crack, dent, or have failed joints. Request maintenance or product information when available and use repair materials compatible with the existing trim.
9 Check Drainage Openings Look for weep holes or other designed drainage openings in the window assembly and make sure they are not sealed or blocked by debris. Some windows rely on these openings to release incidental water. Blocking them can interfere with drainage. Do not caulk over drainage openings; ask an inspector to confirm which openings are designed to remain clear.
10 Assess Nearby Interior Signs Inside, check around the same window for water stains, peeling finish, soft trim, or musty odors. Interior symptoms can help reveal water intrusion that is not obvious from the exterior. Document the location and ask for further evaluation if signs are present, especially before closing or finalizing repairs.

Comparing Maintenance Needs, Durability, and Costs

Exterior window trim affects both curb appeal and the work waiting after purchase. Look closely at lower corners, joints, and sill edges, where water often leaves clues. Probe painted wood gently with a small tool only if the seller permits; softness can signal concealed decay. Small clues matter. A fresh coat alone does not prove the assembly is sound.

Wood offers crisp details and can be repaired piece by piece, but it needs regular paint and careful joint sealing. Cellular PVC and other plastic trims resist rot and reduce painting, though they can expand in heat and may be harder to patch invisibly. Aluminum-clad trim needs little upkeep, but dents and damaged coatings can expose vulnerable areas. Fiber-cement trim is sturdy, yet installation and repainting still affect its lifespan. No material is maintenance-free.

Compare total costs, not just the purchase price. Ask for estimates that separate trim replacement, flashing repairs, caulking, and painting; hidden water damage can change the bill quickly. Local labor and access also matter, especially on upper floors. Check whether joints are tight and whether water can drain away from the frame. I would treat these details as useful evidence, not a guarantee; even a careful inspection can miss damage behind the trim.

Choosing Exterior Window Trim for Your Home and Budget

Exterior window trim affects curb appeal, maintenance, and how well windows meet the surrounding siding. When comparing homes or planning upgrades, look closely at the trim’s condition. Peeling paint, soft wood, open joints, or dark staining may point to moisture problems. A fresh coat can hide damage temporarily, so inspect corners and lower edges carefully.

Tip: Match the trim choice to your climate and upkeep habits. Painted wood offers a traditional look, but it needs regular inspection and repainting. Cellular PVC resists rot, though its appearance and installation details may not suit every home. Fiber-cement trim can be durable, but it requires careful cutting and fastening. Ask a qualified contractor how each option handles local weather and connects to the existing wall. Small details matter.

Set a budget that includes more than the trim itself. Removal, repairs to hidden framing, flashing, paint, and labor can change the final cost. Request itemized estimates, and ask what happens if damaged material appears after removal. For a modest refresh, repairing sound trim and repainting may be practical. For widespread decay, replacement could prevent repeat work. I would not choose solely by the lowest quote; unclear preparation details can become expensive later.

Request Your FREE Quote